Friday, December 31, 2010

A Recap of My Hand Made Christmas

Christmas was great this year. I stuck to my handmade/art supply pledge almost 100%. I was also the recipient of many awesome hand made goodies and art equipment/supplies. But of course the best part of the holidays is seeing family, eating food, and building fires.

Here are the hand made items I managed to finish just in time for Christmas this year.

Like a true procrastinator, I stayed up 'till 2:30am Christmas Eve to finish this cowl designed by my friend Melynda. The yarn is so soft and warm!
My mom just LOVES her new cowl!
  I'm so pleased with the outcome, and it was an easy satisfying knit.

For B Nummy I made silver cufflinks, every guy needs a good pair!
I have been planning to make these since I first moved to Ann Arbor (5 years ago). 
That's how old my sketches were for these! They were not quite as 'easy' as the cowl, but just as satisfying.
Did you receive any handmade gifts this year? Or perhaps make gifts for others? Do tell! 


Friday, December 24, 2010

Fossil Frenzy

There is something really captivating about a fossils to me. Not only the beautiful and sometimes unexpected patterns interest me, but the history the stone represents. Like many Michiganders I have fond memories of collecting Petoskey stones on many beaches.
Unlike Petoskey stones which are fossilized coral and usually have only grey/brown hues, petrified dinosaur bones can vary widely in color. The color depends on which minerals it is petrified with, calcium, silica, or quartz. Though difficult to see, this dino bone has a beautiful pattern of oranges, reds, and brown hues with pockets of white quartz crystals (click to enlarge image).

But enough history and geology...back in the summer of 2006, I bought this cabochon (among others) from a little shop up in Frankfort Michigan. I finally got around to setting it and also made custom chain. I chose to add a carnelian bead to draw out the warm colors in the cabochon.
It is defiantly big, and therefore somewhat of a statement piece. I constructed the bezel somewhat unconventionally, putting a break in it where the rings attach on either side. I liked the visual difference. Overall, I think this piece has a modern clean look, and I like the contrast of modern feel with such an old specimen.

Wednesday, December 22, 2010

I Heart Holiday Paper Craft

This year has been a very busy holiday season. So busy in fact that Brian and I did not have time to get a tree! Which was a bit of a bummer to me...BUT I spent time making some great holiday paper crafts instead of time decorating a tree.
You can find directions for these here.

And as part of my hand-made pledge, I made more of these for my coworkers as gifts this year...

Monday, December 20, 2010

Beach Glass- Custom Pendant #2

Remember this post? Well I'm making good on my promise, here are some photos of my process along the way for the second pendant I'm making for Bryan. First, the beach glass pieces, I wanted to show these beauties...I'm jealous I don't get them for myself.
First step, make the base for each glass piece, cut, file and solder to proper shape...
Step two, make a lot of prongs by melting silver wire at one end into balls, file and attach each to the base, add loops to the corner peices...
I was not quite in the clear after adding the prongs. It is a little tricky to estimate exactly how long to make the prongs because each piece varies in thickness. I admit I had to remake a few. To hold the pieces securly a few more prongs were added as well.

Step three, attaching the individual bases to make one uniform base (not cleaned up yet)...

This was by far the most difficult step. Primarily because keeping the solder points of the prongs in tact while joining the pieces is a bit tricky (even when using different temperature solder). You can actually use white out to prevent solder from flowing, but the fumes are pretty rank. So until I get air filtration system in place I avoid using it at home. 

Final outcome...

Thursday, December 16, 2010

Holiday Baar Bazaar

This Friday!
Check it out and buy handmade!

Monday, December 13, 2010

Easy Ornaments

Cold weather + snuggling under a blanket + cup of tea = feel like gettin' crafty.

This year I took a handmade pledge, meaning all gifts I give will be hand made either by me or another artist.  Ready Made's Nov/Oct issue featured little geometric balls made out of paint samples. When I first saw them I immediately thought it would make neat ornaments for a Christmas tree.

Blue House also used this idea to make ornaments at one of their workshops. I learned a few great tips there. One was cutting out an equilateral triangle out of card stock (instead of tracing triangles on every individual circle). Another was punching holes in them and using them as covers on a string of lights. So cute!
Building each side with 5 circles and adding the middle layer (left)...Top & Bottom portions (right)...
This ornament along with some super cute magnets I scored from Blue House were packaged together. I used them in a traditional $5 gift exchange at a family Christmas party. Perfect!
Full directions are here for detail on how to makes these guys.

Sunday, December 12, 2010

Mitten Made at Blue House

Still looking for gifts this holiday season?
Blue House has got you covered!
Support hand made and shop local all in one stop this year at Mitten Made.
Saturday December 18th from 11am-6pm
If you haven't stopped by the Blue House shop before you are missing out! Many local artists will have their handmade goods for sale. Knits, prints, jewelry, illustration, sewn goods, photography and a plethora of other great gifts can be found.

Friday, December 10, 2010

Three Things for 30

Many of you know I will be turning 30 in April. Instead of dreading it I decided to use it as motivation by making a list of three things to accomplish by the time I'm 30. Since I have a few months, I wanted to make my goals challenging but realistic.

The first things that came to mind in no particular order were
1. Organize my Jewelry Studio Space
2. Organize my Craft Room (sewing, knitting, and paper craft supplies)
3. Design a business card, packaging, and make promotional materials for Three Birds Jewelry

You may remember a preview of my studio. And, I think you would appreciate the challenge of task 2 if you have seen my craft room lately (too embarassed to show a photo). For #3 I will rely on my knight in 'creative' armor for help.

Ok, so really Brian will likely help with anything having to do with building.

Well, I think I got the 'challenging' part down...not sure how 'realistic' my list is though since we are (still) building a fence and plan to tile the kitchen floor soon.  Wish me luck!

Wednesday, December 8, 2010

Beach Glass- Custom Pieces for Bryan

Recently a friend Bryan asked me to make some custom jewelry. As a pastime, he and his wife collect beach glass along Lake Huron. I haven't worked with beach glass but have always wanted to beacuse it's beautiful colors and rough natural appearance.

I really enjoy custom work because with the right client I can use my artistic digression. It can also be an opportunity to work with new materials.

Bryan wanted a necklace and earrings set. I knew my biggest challenge would be 'flow' since no two pieces of beach glass are alike.

Bryan really liked two pendants I sketched so he asked me to make two! Both necklaces feature multiple glass pieces. In case I could not complete them BOTH before Christmas he choose one necklace to start (thanks to Laura who reeled me in on that one).

Since the glass would be roughly shaped I decided to use prong settings. You may remember this piece with prongs, but I had another 'method' in mind. It was also important to allow light to come through the jewelry.

Making prong settings in this fashion was WAY easier than with the coral and larimar piece. This was because I did not have to hold the prong perpendicular to metal sheet while soldering. I thoroughly enjoyed making these pieces, I was really in the zone during construction. Some other shots...
Stay tuned, I plan to post about the other pendant with photos that show my process...

Tuesday, December 7, 2010

Ypsilanti Craft Meetup

Corner Brewery in Ypsi is hosting a craft meetup tonight starting at 7:30pm.
I won't be able to make it, but for all ya'll who don't have something going on a Tuesday evening, it sounds like fun!

Sunday, December 5, 2010

Patty Pendant

When my brother and his girlfriend Patty visited in September, Patty was sweet enough to bring gifts. Thoughtful gifts too, B Nummy got fudge -the real deal- from Mackinak and she couldn't decide which of two necklaces to get for me so she bought both!

I was bummed when one of the stones came loose in it's wire wrap setting. The stone had slightly chipped. I removed the stone and decided I would take it upon myself to transform the piece.

I wanted to set the stone because it would be more secure and protected. So I started sketches. Here they are so you get a preview of how my brain works...at least sometimes.

The stone was rather soft, I filed the chipped part (at the point) and the ridges that used to hold the write wrap. Good as new!

I didn't want to set it with the point at the top, avoiding an 'expected' setting. My first two drawings felt a little too bulky, so I traced the stone in two directions (3rd drawing, left) to create a mirror image. This brought balance and a lighter feel.

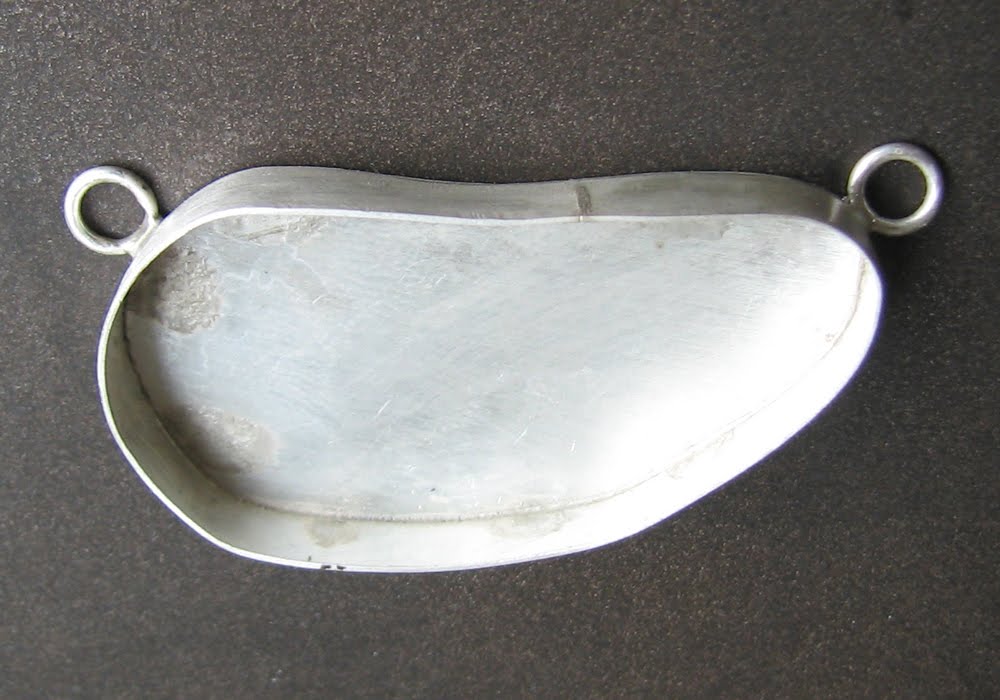
That transitioned into a circle rather than the exact shape of the stone...the wheels were turning! I stared my construction modeling after the 2nd sketch on the right. I had a lot of trouble with this construction, getting solder to flow completely for the bezel was one issue.

I actually meant to do a cut out on the back (3rd drawing, right).  But I got excited when all the soldering was completed successfully. I set the stone before even thinking about the cut out. I think perhaps it wasn't meant to be...even if a cool idea.

Final piece includes some custom chain and has a brushed finish:

Brian said it reminded him of alien crop circles, not sure how I feel about that!? What do you think? Feel free to comment below!

Saturday, December 4, 2010

Support Hand-Made this Holiday Season!

I've taken a 'hand-made pledge' this year. I'm either making gifts myself or buying hand made (with the exception of buying art supplies for others). It can be challenging to think of ideas for everyone, so I put this list together on Etsy. Enjoy!

Monday, November 29, 2010

Opal Earrings

Lately I have been busy with all things NOT jewelry...building a fence (pics to come at some point) knitting holiday projects...

...and hosting Thanksgiving among other things...

But I have found some time to work on a custom project for a pair of earrings.

Earlier this year a friend (Andrea) bought an opal necklace from me for her daughter's birthday in October. Andrea also wanted me to make some earrings to match as a Christmas gift...so I went shopping! I wanted to find something that was similar in shape and color and was lucky enough to find a pair of opals that matched at the Bead Gallery.
In keeping with the 'flowy' design of the pendant, I decided to make a loop at the top of each opal (similar to the pendant), and then to have the ear-wire come through the loop. This would make the earrings dangle with a bit of movement. The outcome...

Stay tuned, I have another custom project for an earrings and pendant set.

Cyber Monday Free Shipping

Free shipping on lots of goodies, happy Cyber Monday!

Thursday, November 18, 2010

November Sale #2

As promised, more items posted for sale today, enjoy!

Friday, November 12, 2010

November Sale

Happy November! I'm having a sale on a few items in my shop, check it out!

Wednesday, November 3, 2010

Up, up, and away!

Yet another reason my blog and Etsy have been a wee bit quiet...

We'd been trying to plan a 'stay-cation' for a while and we finally managed to set aside a weekend. One Saturday afternoon we went to some workshops at Irene's where we learned how to give each other neck and head massages, foot massages, and went to a workshop on meditation. Sunday was really the big day though, we ate a big 'ol (overpriced) lunch at Melting Pot and I surprised Brian by scheduling a 'discovery' flight at the Ann Arbor Airport. We went up in a 4 seater with an aviation instructor and had ourselves a blast! Brian flew to Jackson and I got to fly back and have a front seat view when the instructor took us on crazy turns and on a 'pencil drop'. It was an awesome weekend and much needed couples time. Here are a few more pics...


Monday, November 1, 2010

Why so quiet?


I know...it's been pretty quiet on my blog and Etsy shop lately.
You may have seen these...
or these...

But other than that it's been pretty low key, here are a few reasons why...
Distraction #1 (who knew mufflers could have such acrobatic ability)

Distraction #2 (Halloween at work- This year I was in charge of coordinating efforts for our annual Halloween party at Cayman. We were Indiana Jones and Obstacles)


If you didn't guess it, Evan is Indiana, Rana is Henry (Indi's dad), Laura is a boulder and I am a snake pit. Awesome. Hope you had a happy Halloween.


Friday, October 15, 2010

Humble Beginnings

Earlier this summer when Bri and I hosted a BBQ I was embarrassed when a friend asked to see my jewelry studio. It was a bit of a reck because I had been jammin' it to finish a project...and let's admit it, my 'studio' isn't much more than a used craftsmen bench with drawers that barely open (bought from ReUse Center), my tank, torch, a pickle pot, and a few essential tools. All located in our less than glamorous basement. Not exactly a room with a view, but the cement walls and floor make it a safe working space usable year-round (our garage is not insulated).

So I thought I would chronicle my studio space since I plan to make improvements (slowly but surely). Here are pics of my start.
A view from the top...
I have to give Bri a BIG thanks because he installed the lights above my work station as well as the outlet. We have plans to make my bench an L shape, Bri already installed another outlet. This summer we did a minor remodel in the house; took down a wall and put in wood flooring. We saved the 2x4's from the wall and will likely upcycle them to expand my work space (you can see them peaking into the pics). I also have a peg board on which I plan to hang my tools.

I would love to hear any organizational ideas you have or great DIY blogs/websites you know of, so please be sure to let me know in the comments section below.

Monday, October 11, 2010

Larimar Necklace #5

This post is part of a series answering just how I do what I do. I'm constructing this piece in conjunction with my blog posts. Last time I left off with attaching jumprings to hold the chain.
 
Setting the Stone
At this point I'm in the home stretch! All the soldering steps are complete and I've trimmed most of the excess silver with my coping saw and have done some filing/sanding. All this manipulation has caused a little work hardening of the silver so I decided to heat the piece again to soften the bezel before setting the stone.
 
I haven't mentioned it before, but after soldering steps or using flame on silver I put my piece in a pickle. I bought my pickle pot from target for $5! Once it soaks for a bit, I remove my piece and rinse it in a water and baking soda solution to neutralize the acidic solution.
To set the stone, I simply put it into place and use burnishing tools (pictured left) to gently bend the bezel over the stone...it sort of 'hugs' the stone and securely holds it  in place.
 Top views after setting the stone...
Side views...
If you recall from my sketch, I debated putting some larimar beads in the chain. After thinking on it I wanted to do something to add a little more visual interest since it is such a simple setting. I was thinking possibly an asymmetric twist, but as it turns out larimar beads I have are a bit greener then this beautiful blue larimar. So they just didn't fit. Stay tuned to see what I decided on to finish this piece once and for all! 

Saturday, October 9, 2010

Don't Forget To Look Up

Saturday was too beautiful to squirrel away my time in my basement studio. Bri was off to Midland with his dad to make a visit to his grandparents so I took Rudi to Independence Lake County Park.
There's no being quiet in the woods today...the leafs crunching under our feet contributed to the cacophony of sound at this beautiful park.
Who said we couldn't go for a swim? I took off my shoes, rolled up my pants and went for it!
Of course there were sun-lit leaves...
Pretty juniper berries littering our walkway...
Funny bug patterns on trees (emerald ash-borer killed this tree)
And pretty red and green moss growing on fence posts...
Today is absolutely beautiful. I love Michigan! 

Tuesday, October 5, 2010

Live and Learn

At first glance this may not look so bad. I didn't bother to do any finishing so it all looks pretty rough (oh and please ignore the Rudi hair on the stone in the pic...). I certainly didn't bother making the chain (yet) which would have brought balance to such a large piece. Sad to say but this is one of those live and learn constructions.

Heart wrenching, but I will probably have to start over. 


The problem, the janky bezel at the top of the stone. Executing the design -which incorporates two silver balls sandwiched between the bezel and the bail- prevented me from properly pushing the bezel toward the stone. I did not anticipate this in my original sketches or even during construction. I was distracted by the challenge of the design overall (soldering the balls into place, positioning them...it wasn't easy). If the stone had not been so thinly cut (and thus the bezel would have larger surface area) this might not have been a problem, but there just wasn't much room for positioning the silver balls. 

Part of me wishes I wouldn't have tried to push the bezel into the stone near the balls, which would have left a slight gap but at least a smooth transition. Instead I tired to go for it and the result was disappointing. In the end, I probably would have been disappointed if I left the gap anyway...so I'm glad I went as far as trying to make it work...even though it means starting over.

I COULD try and remove the balls, push the bezel properly over the stone, and try and re-solder the balls and bail into place. BUT all this risks breaking the stone under heat or discoloring it. There are some materials I have (Heat Shield) that is supposed to protect stones and used for repair. But at least right now I'm not feeling that adventurous. So I am proposing to use my second favorite design for this stone...you will have to tune in later for the finished piece. However, at the moment I'm feeling a little defeated and need to take a bit of a break from this one. 


Friday, October 1, 2010

Etsy Metal Anniversray

Those of you who've checked out the blogs I follow may have noticed one called Etsy Metal. This blog has been a great source for me for tips, tricks, and ideas, such as this one which believe it or not I had never heard of until this blog post (and I've been making jewelry for a few years)! Just goes to show there is always something to learn!

While it's always great to spread the word about good resources and blogs, Etsy Metal is celebrating 4 years and I admit this post is partially a shameless attempt to be entered in a drawing where I might win a $50 gift certificate. Wish me luck and spread the word, it really is a great blog!

Wednesday, September 29, 2010

Larimar Necklace #4

This post is part of a series answering just how I do what I do. I'm constructing this piece in conjunction with my blog posts (well sorta...I did this work last week). Last time I left off with connecting the bezel to the silver base silver sheet.

Making the Bail- or something like it

Usually the last soldering step for a pendant is attaching a bail (the bail is what the chain goes through to hold the pendant on the chain). For this design however, I'm not making a bail per se, but rather attaching two rings to either side of the pendant. This allows me to have a little more say in the aesthetic, since I get to chose the chain for the pendant and if I want to put beads or other accents in the chain.
Before soldering...lining it all up;
In this case I'm using two jump rings that closely match the size of the chain. Each jump ring will be soldered so they will be permanently closed rings. I choose this way for two reasons. First, it's a precaution to prevent snagging (and potentially bending) if I choose to give it a high-shine finish by using a buffing wheel (I'm paranoid). Second, to clean the pendant later on I would take it off the chain. It's better not to have movable jump rings on the pendant because if opened improperly they might bend or look 'janky'.


If you recall from my first two steps of soldering, I've used hard and medium solder. To attach the jump rings I use easy solder. Once they are attached, it is back to sanding and finishing. You can see in the pics that I have trimmed the excess silver along the bezel and have done a bit of sanding...I tend to clean up the piece most of the way before setting the stone.

Find me...

Website
Facebook
Etsy

Email
I Took The Handmade Pledge! BuyHandmade.org