Wednesday, September 29, 2010

Larimar Necklace #4

This post is part of a series answering just how I do what I do. I'm constructing this piece in conjunction with my blog posts (well sorta...I did this work last week). Last time I left off with connecting the bezel to the silver base silver sheet.

Making the Bail- or something like it

Usually the last soldering step for a pendant is attaching a bail (the bail is what the chain goes through to hold the pendant on the chain). For this design however, I'm not making a bail per se, but rather attaching two rings to either side of the pendant. This allows me to have a little more say in the aesthetic, since I get to chose the chain for the pendant and if I want to put beads or other accents in the chain.
Before soldering...lining it all up;
In this case I'm using two jump rings that closely match the size of the chain. Each jump ring will be soldered so they will be permanently closed rings. I choose this way for two reasons. First, it's a precaution to prevent snagging (and potentially bending) if I choose to give it a high-shine finish by using a buffing wheel (I'm paranoid). Second, to clean the pendant later on I would take it off the chain. It's better not to have movable jump rings on the pendant because if opened improperly they might bend or look 'janky'.


If you recall from my first two steps of soldering, I've used hard and medium solder. To attach the jump rings I use easy solder. Once they are attached, it is back to sanding and finishing. You can see in the pics that I have trimmed the excess silver along the bezel and have done a bit of sanding...I tend to clean up the piece most of the way before setting the stone.

Thursday, September 23, 2010

Another ETSY treasury

I'm honored to be iincluded in a number of ETSY treasuries lately...this ring certainly seems a popular fall pic! Check them out if you'd like to see the collections. The first treasury I've ever been included is here, here, and most recently here!
Thanks!

Monday, September 20, 2010

Larimar Necklace #3

Thought I'd never get back to it, did ya? Well, I'm finally revisiting the larimar pendant I started way back when...
This post is part of a series answering just how I do what I do. I'm constructing this piece in conjunction with my blog posts. Last time I left off with bezel construction, and by now I have finished the hand filing.

Soldering the Bezel to the Sheet

I can now move on to joining the bezel to silver sheet. I ALWAYS check to make sure the bezel fits the stone's shape right before I solder the bezel to the sheet. The silver sheet is cut to give a little play room in case the bezel moves a centimeter or two while I'm working.

Any time you are working on a project that has multiple soldering steps, it is important to use various types of solder that melt at differing temperatures. I use three types of wire solder; hard, medium, and easy (also called 'soft'). Here is an overview of soldering if you want to learn more. In the below pic you can see little cut pieces of solder lining the bezel...

To join my bezel ends together, I used 'hard' solder. To join the bezel to the silver sheet I use 'medium' solder. The medium solder heats and flows (or liquefies) at a lower temperature than the hard solder. Using medium solder during the second solder step allows the initial solder joint on the bezel to remain in tact.

Another important component to soldering is flux, which is a liquid that allows the solder to flow and prevents firescale. In this instance I've used boric acid and denatured alcohol as well as an additional liquid flux.  While there are more than 3 types of solder available and some projects certainly have more than three steps of soldering, a little ingenuity and skill can bring you a long way.

Once the bezel is uniformly attached to the sheet, I trim excess silver using a jewelers coping saw...
...if needed. Otherwise I use metal files by hand and use sandpaper to make the final shape. In this instance, the silver sheet will be flush with the bezel. I clean up the metal to a decent extent at this point, but I'm not done soldering yet! So, I will come back to more sanding later.

Friday, September 17, 2010

Visit's Home

I have been blessed with some great visits this month, my brother Dan and friend Erik last week and uncle Bob this week.  So, while I haven't worked a ton on jewelry (outside of Dan's Custom stuff), I have had the pleasure of good company and even the opportunity to cook a nice meal or two.

Naturally I wanted to post about one of those meals which has become a staple in our house. It's one of my favorites to prepare for many reasons; simplicity, flavor, use of ingredients, and visual appeal. No I cannot claim this Garlic Roasted Chicken recipe as my own (I have to thank Food Network Magazine). Here's a pic after the chicken is browned and right before I pop it into the oven...
Simple. Fragrant. Amazing.
I found it impossible to find skin-on boneless chicken, so I used skin-on bone-in. Another reason I love making this recipe is the use of fresh rosemary (from my garden) and the aroma that fills the house. I prefer using locally grown garlic because the cloves are smaller and crisp up nicely. The recipe calls for 425F oven temp, but I bring it down to 400F to accommodate for brussels sprouts which I toss in olive oil, sea salt, and cracked pepper. Baking the little cabbages in a single layer on a baking sheet and turning them periodically results in a nicely browned, slightly crispy outer layer. I wish I would say I had a fab pic of those brussels sprouts and the basil/tomato salad I made but I don't. The above preview will have to do and you will have to use your imagination, or better yet try it all yourself! 

Thursday, September 16, 2010

ETSY treasury

Check it out! One of my pieces has been featured in an ETSY  treasury, how fun!

http://www.etsy.com/treasury/4c918df5b4a86d9116c749d9/modern-nature

Tuesday, September 7, 2010

Project Dominican- Custom Pendant for Dan

 Ok, so I'm guilty...I haven't made a post in a while. But it's because I have been working hard on a 'secret' project. Here is the big 'reaveal' with a detailed juicy post.

My brother sent me a sketch for a piece he wanted me to construct as a gift for his girlfriend Patty. It was an AWESOME sketch! In mid-June he mailed the materials from which I would construct the pendant; a piece of coral they found snorkeling and some raw larimar both from their trip to the Dominican Republic.

I had to take both to a lapidary, since I have neither know-how nor equipment up to the task. The organic look of the coral was important to maintain, so I asked the ladies at The Bead Gallery to simply slice the coral in half. The larimar was made into two small circular cabs as well.

Because the rough organic nature of the stone, I felt prongs were best to hold it into place. Part of the design also included a bass clef (made of mixed metals and larimar). Since Dan wanted the bass clef set on top of the coral, this was an especially challenging design. It is also challenging to work with very small cabochons in general (I burned the bezel on one cab initially and had to start over...oh well).

One of the structural challenges I ran into was how to set the larimar cab's and the bass clef so that the coral could be set into place. In the sketch, the larimar cabs are on one cut out piece of sliver and the rest (the curvy part of the bass clef) was a separate piece of silver. Both are shown bending over the stone. In order to get the coral in place we modified the bass clef to be one piece (so the larimar is attached to the curved part). This allowed me to 'slide' the coral into place from right to left.

Based on past experience, cutting sheet metal and bending it over a stone can be quite tricky to get the right angles and lines to match a sketch. So I needed to do a fair amount of testing to see what would happen. Some pics along the way....


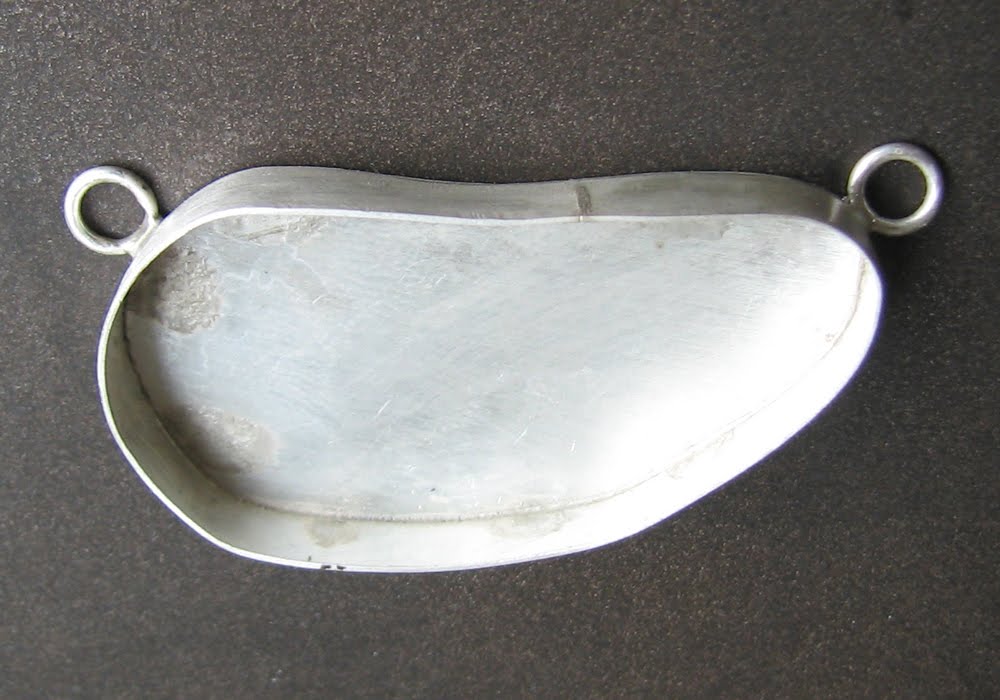
I continued by putting on a third prong (upper right), attaching the bass clef to the copper base, then made and attached the bail (the part the chain will go through)...
Setting the coral and larimar stones were the last steps before the finishing...and boy did the finishing take F O R E V E R!
Here is the final product with a brushed finish on both the copper and silver:

This project was full of downs (burnt bezels and bass clefs, prongs getting detached during solder of multiple steps, and even breaking off the tip of the bass clef when attaching it to the copper base) but it was also full of ups (getting more experience at prong settings, applying tricks of the trade, having success bending copper over the stone). It was not an easy construction! But in the end I am completely delighted to have finished it, and to have been able to do such a crazy complicated project without going completely insane.

You may be wondering, what ever happened to that other half of the coral...well you will find out in due time!

Find me...

Website
Facebook
Etsy

Email
I Took The Handmade Pledge! BuyHandmade.org